Blog
Don’t lose Google rankings with a new or updated website

After weeks of hard work, the moment has finally arrived… Your new or updated website is ready to go live. A final test puts your mind at ease: all content is flawless and in the right place—check. Forms, downloads, and sales channels work seamlessly—check. Your tracking scripts are sending the correct data—check. Your ads are ready to drive quality traffic to relevant pages—check. Checklist… double-check. This new site is going to shine!
However, after a few days or weeks, you notice that all the parameters you hoped to improve with your website update—more visitors, leads, and sales—are falling short in practice. What now?
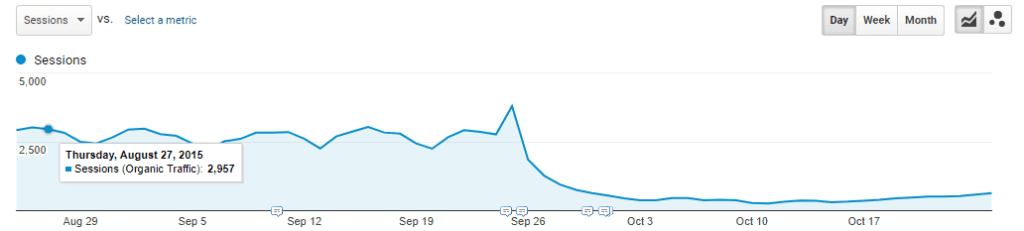
Identifying the cause of the decline
Through analysis, you can determine which search terms have lost ranking in Google or identify specific web pages that have been most impacted by your website update or migration.
Loss of ranking
Are you ranking lower for certain search terms than before? Using specific software and ranking trackers, you can retrieve historical ranking data and compare it with the current situation. Most website owners already have an idea of the terms they ranked well for in the past. Search Console can assist in listing and verifying these search terms.
Traffic on your landing pages
Check through Google Analytics which pages of your site are most commonly used as landing pages by visitors. A landing page is the first page through which a visitor enters your website. This could be your homepage, a product detail page, a services overview, or a specific blog page.
Compare the data from before with the period after your launch or update. You might find that a page that used to function frequently as an entry point no longer exists in your new design. Without content, there’s no traffic. If the page does exist but receives little or significantly less traffic, further investigation is needed to determine whether a different issue (possibly technical) is at play.
What is a redirect?
A redirect is a way to forward visitors from one page on your website to another. It is used when a URL is changed, guiding visitors from the old URL to the new one. Through this mechanism, users accessing the old URL will be seamlessly directed to the new page.
Example:
Old contact form URL (website.be/contact) → New contact form URL (website.be/contacteer-ons).
A redirect tells browsers and search engines that the old URL has been replaced by the new one.
There are different types of redirects, each identified by a specific status code. The most common redirects are HTTP 301 (“permanently moved”) and HTTP 302 (“temporarily moved”).
Why set up a redirect?
Setting up a redirect is crucial for maintaining your website’s search engine rankings. If a page’s URL changes, search engines will treat it as a completely new page. All the value—such as ranking—you’ve built over time for that specific page will be lost. Without a redirect, Google essentially starts from scratch, and rebuilding rankings takes time.
Forgetting to set up a redirect can lead to a loss of ranking in search engines, forcing you to begin anew.
Redirects also impact your website’s authority. Backlinks (links from external sites) increase your site’s authority, which is a key factor for good rankings. Without a redirect, backlinks to your site will lead to non-existent pages (404 errors), resulting in broken links. This means the authority from these external links is no longer passed to your website. Over time, this loss of authority can allow competitors to surpass your position in search engine results.
From a user experience perspective, encountering a 404 error message—”This page does not exist”—is frustrating and confusing for visitors. While it’s best to avoid 404 errors altogether, you can design an appealing 404 page that explains the issue, offers assistance, and provides alternative navigation options as a safety net.
Setting up a 301 Permanent Redirect
When launching a new or updated website, you should permanently link old URLs to new ones. This is known as a 301 Permanent Redirect. This redirect type is only necessary when the URL structure changes and should only be applied if the content remains largely unchanged.
Example:
The old contact page URL (website.be/contact) differs from the new one (website.be/contacteer-ons). In this case, a 301 Permanent Redirect should be set up. If the URL remains the same (website.be/contact), a redirect is not required.
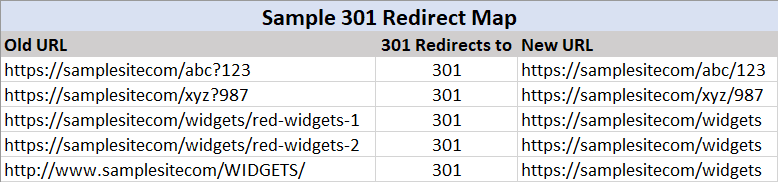
Given the potential number of old URLs needing redirection, creating a redirect plan is essential. This helps ensure that no links are overlooked, maintaining both your website’s user experience and search engine performance.
Step-by-Step Plan for Maintaining Rankings When Updating Your Website
Before starting a website migration, it’s essential to follow these steps to preserve your rankings as much as possible:
- Map Out Your Current URLs
Document all the existing URLs on your current website. This creates a clear overview of the structure and ensures no pages are overlooked during the migration. - Map Out Your New URLs
List the URLs for your new website to match them with the old ones. - Create a Redirect Plan
- Develop a clear overview of all old URLs that need to be redirected to their corresponding new URLs.
- Avoid redirecting all old URLs to a single page (e.g., the homepage), as this can harm your SEO.
- Depending on your CMS, you can use plugins or manually configure redirects through your website’s
.HTACCESSfile.

- Create a Redirect Plan
- Develop a clear overview of all old URLs that need to be redirected to their corresponding new URLs.
- Avoid redirecting all old URLs to a single page (e.g., the homepage), as this can harm your SEO.
- Depending on your CMS, you can use plugins or manually configure redirects through your website’s
.HTACCESSfile.
Example: A 301 Redirect Plan ensures that old URLs permanently point to their new counterparts.
- Test Your Redirects in a Test Environment
This critical step often reveals missed or incorrectly configured redirects. Thorough testing ensures that everything works as intended before the actual migration. - Prepare Your SEO Before Indexing the New Website
- Set up internal links.
- Optimize pages with the right keywords.
- Ensure the website is fully completed before allowing it to be indexed by search engines.
- Launch Your New Website
Once everything is ready, make your new site live. - Monitor and Analyze
- Use Google Analytics to assess how the new site is performing.
- Identify issues through tools like Google Search Console and optimize accordingly.
Tip: If you’ve lost access to your old website, you can retrieve an archived version using web.archive.org.
Website Launch Checklist
This guide focuses on maintaining rankings by implementing 301 Redirects. However, there are many other factors to consider when updating or launching a new website.
You can download our comprehensive website launch checklist to cover all aspects of a successful migration.
Need help with your website update or migration? We’re here to assist!
Blog
Other blog articles
Want to read more? Discover more about our expertise in the blog articles below!


